If you are planning to scan rolls with a flatbed scanner, you might be interested in a new TIFF to CIS utility that avoids the 30,000 line limit imposed by Photoshop on BMP files.
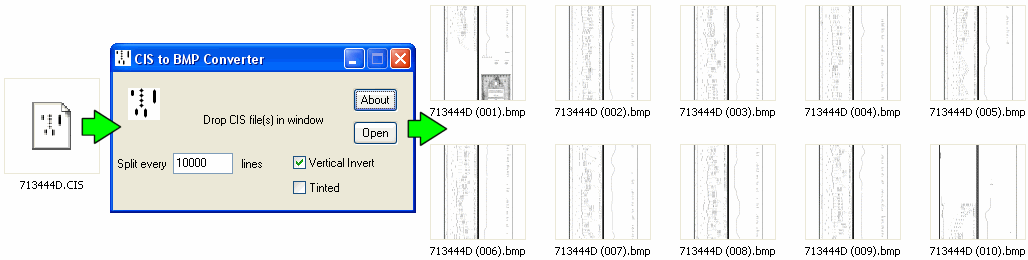
CIS2BMP converts a CIS roll scan image file into a sequence of Windows BMP files suitable for editing in a conventional paint program.
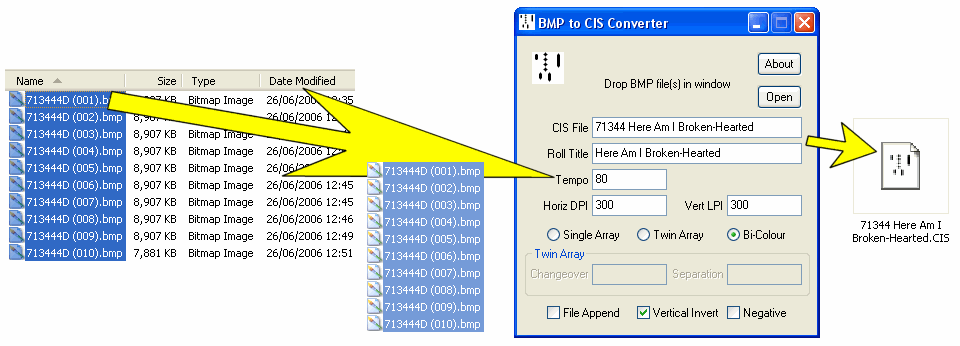
BMP2CIS recompiles the BMP images back into a CIS file.
Current versions:
Download both utilities: CIS2BMP.ZIP, 9041 bytes
The BMP to CIS utility was conceived originally as a means of recreating a CIS scan file from a series of scanned A3 photocopies for a project Rex Lawson was working on. Richard Canedo is currently pioneering its use in the production of CIS files from rolls scanned directly with a flatbed scanner, using Photoshop to stitch the images together seamlessly.
The addition of a complementary utility to convert a CIS file into manageable sized BMP chunks makes it possible to edit existing roll scans using a conventional image editor and then recompile them back into CIS files.
 CIS2BMP.EXE converts the CIS file into a series of Windows BMP files. If the chosen split interval is greater than the total number of scan lines then everything will end up in one BMP file, though so far the only image editor found to be capable of handling files this large is an up-market version of Photoshop, and even then only in TIFF or its native file format.
If the file is a Bi-Colour or Twin Array scan, the secondary image appears to the right of the primary image. A Tinted option redefines white in the palette as something more colourful but this is purely cosmetic. A Vertical Invert option flags the file orientation as bottom up and this should match the state of the corresponding check box in the BMP2CIS utility. BMP files were originally all bottom up and some early paint programs assume this, so if in doubt check the box.
The CIS file format was designed specifically for roll scanning and the header contains information, like the roll tempo, which is beyond the scope of the BMP format. The CISREPORT utility may be used to extract this information from the CIS header so that it can subsequently be reinstated in the recompiled CIS file. More problematic is the encoder clock signal in Type 2 & 3 scans which is embedded with every scan line. The solution here is first to convert the file to a Type 4 scan using CIS-RECLOCK.EXE, which re-clocks the scan file to give a fixed number of scan lines between each encoder clock interval, so that the encoder clock may then safely be discarded.
BMP2CIS.EXE performs the compilation from multiple BMP files back into a single CIS file. The target filename is entered in the box provided, the CIS file extension is assumed and the target file will be placed in the same folder as the source files. Normally it's easiest if all the source files are dragged and dropped together from an Explorer window into the utility window and the entire file is then recompiled in one operation, overwriting any existing file with the same name. Alternatively, files may be compiled in stages by ticking the File Append box so that files dropped into the window are tagged on to the end of an existing compilation.
Blocks of files to be recompiled should first be sorted into numerical order in the Explorer window, but even so Windows has a few quirks which can cause the files to be reassembled out of sequence. To guard against this, first click on the last file in the sequence then, while holding down SHIFT, click on the first file in the sequence to mark the block. Alternatively mark the block by dragging a rectangle over the files, starting at the bottom and finishing at the top. Finally drag the block by grabbing hold of the first file in the sequence.
In an ideal world there should be no need to specify the horizontal and vertical resolutions, as these can be extracted from the BMP file. All the image editor has to do is leave them alone and all should be well. However Paint Shop Pro, for one, gets it wrong. For starters, it ignores the vertical resolution and overwrites it with the horizontal resolution, so if they're different you're already in trouble. Secondly, there's a metric to imperial conversion involved which it gets wrong, so the resolution changes slightly every time the file is saved. If necessary, override the file resolution settings with their correct values by entering them into the appropriate boxes.